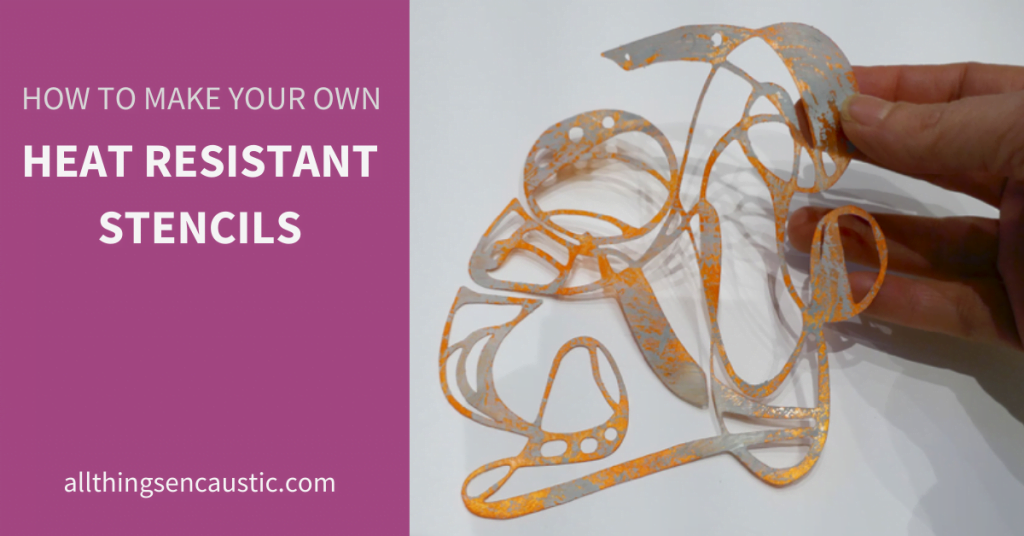
I’m passionate about stencil making! Heat resistant stencils allow me to use my hand-drawn doodles over and over again. One stencil can create hundreds of prints that never look identical. The wonderful by-product of this process is that a used stencil, covered in ink and wax can be a thing of beauty that begs to be used in your artwork.
In this post, I will provide a step-by-step process for making your own heat resistant stencils from a hand-drawn doodle. I provide instructions for cutting a stencil by hand and for using a Cricut Maker.
Stencil Making Tools:
- Black Marker
- White paper
- Laser printer/photocopier (if you are cutting by hand)
- Non-permanent double-sided tape or repositionable adhesive (if you are cutting by hand)
- Dura-lar Polyester Film, .005” gauge – Heat resistant up to 230° C, good tensile strength and tear-resistant. The film can be bought in different sized sheets or on a roll.
- Cutting mat (if you are cutting by hand)
- Precision knife such as X-Acto or a Cricut Maker

The Cricut Maker is a cutting machine that works with your tablet or smartphone. Create or upload your designs to the Cricut Design Space app and the Cricut maker will precisely cut your stencil for you.
Step-by-step stencil making instructions
Step #1: Design your stencil
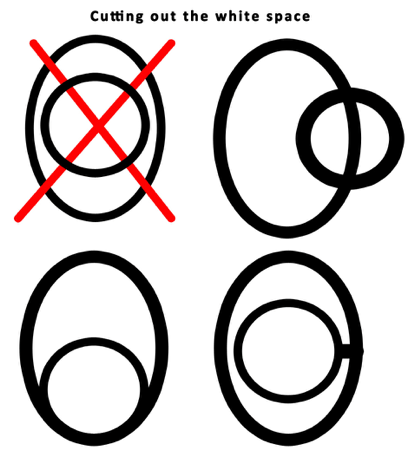
Doodle on white paper with a black marker – the important thing to remember about your drawing is that all your lines connect. For example, if you are cutting all the white space out of your drawing, all your black lines must connect and if you are cutting out the black space, your white areas must connect. If you draw a circle inside a circle without attaching the inner circle to the outer circle, you will lose the inner circle when you cut your stencil. See the samples images below.


Step #2: Experiment with line thickness
Thick lines will give you cleaner prints. Dura-lar is a strong material, you can get away with cutting thin lines but keep in mind that your inks or paint may bleed, depending on how you are using the stencil. My thinnest lines are approximately 1/16 inch thick. Below is one of my used stencils where I cut out all the white space. You can see how I have varied the thickness of the line.

Step #3: Test your stencil
Make a photocopy of your image and use the copy to cut away the white or black space (as your design dictates) with your precision knife and cutting mat. If you are left with a stencil where all your lines are connected and nothing is missing, you have created a good stencil.
Step #4: Preparing your Stencil for Cutting
If you have a Cricut maker, take a photo of your image and make sure it is saved as a .jpg file and do the following:
- Open your Cricut design space, click on “my projects”.
- Click “upload” at the bottom of the menu bar on the left
- Under “image” click “upload image”
- You can drag and drop the file to the design space or browse your files.
- Under “select image type” click “simple” and then “continue” in the bottom right corner.
- with your cursor, click on all the white or black spaces (as your design dictates). When you are finished, click “Continue”.
- Click the image on the right “save as cut image” and then “save” in the bottom right corner. Your image is now saved and ready to be inserted into a “new project” ready for a test cut on paper.
Step #5 A Clean Cut
A clean cut means all your design elements are intact and none have disappeared. If they have, make any necessary adjustments (check that all your lines are connected) then cut another test stencil. If all is good, move on to step 6.
Step #6 Cut your Stencil either with the Circut Maker or by hand
If you don’t have a Cricut Maker, hand-cut your stencil with a Precision Knife such as an X-Acto knife.
- If you are using a precision knife, make another photocopy of your doodle.
- Lay your sheet of Dura-lar over your image and tack it down with double-sided tape.
- Reposition the tape as you cut to keep your Dura-lar from moving. A non-permanent spray adhesive such as Krylon’s Easy Tack works extremely well but make sure you use it in a well-ventilated space.
- Begin cutting as you did with your test cut.
- When you are finished, you are ready to use your stencil!
If you are using a Cricut Maker, you are ready to cut your stencil from a Dura-lar sheet. When choosing your material in Cricut Design Space, click non-adhesive vinyl – 20 gauge.
Using your stencil
Now you’re ready to use your heat resistant stencil. Head over to this post for tips for using stencils in Encaustic Painting.
Ink and wax residue are fairly easy to clean from your stencil with soap and water and a stainless steel scouring sponge.
If you’re excited to make stencils from your own doodles and designs, let me know in the comments section below.


Thank you for the info! This was really helpful. I was looking forward to using my Circuit machine to make personalised hoodies for some friends but I’ve read once vinyl is added to fabric, you need to reassess for fire safety. I’m concerned now?! Any thoughts/tips?
I use my Scan n’ Cut. I mainly purchased it to make stencils. I draw a design on white paper, then I scan in my design, & store it on the machine. To make the stencil, I put my mylar film on my SNC Feeder sheet, pick a stored design, and set to cut my stencil. If the stencil gets damaged I can easily and cheaply print another one.
Sometimes I print my design in the laser printer to make the lines darker, then scan them into the SNC. When needed I cut my stencil.
This is brilliant! Thanks for sharing the process.
You are very welcome, Susan. I hope I have inspired you to integrate my process into your own.
Just got a Cricut for Christmas, and I’ve been super excited to make stencils, but didn’t know what kind of heat resistant material to use. Now I do! Thanks!! So helpful.
Are you loving your Cricut Maker yet Mary? I love mine, it’s such a great tool and I’m so pleased you now know what material to use to make your own heat resistant stencils!
Great article. Thanks for sharing. Heading over to the example page next.
I’m so pleased you like the article! Enjoy the example page and let us know if you have any questions.