In the last post, I talked about the best way to paint a smooth encaustic surface. In this post, I’ll introduce you to an alternative way to achieve a glossy smooth encaustic painting surface—the pour method. This method works exceptionally well for photo encaustic.
Supplies
By purchasing products through the following Amazon affiliate links, you support this website.
- Painting substrate – for the first time, start small
- Blue Painter’s Tape or HVAC tape (Aluminum Foil Tape Metal Insulation Tape for Ductwork)
- Encaustic Medium
- A level
- Parchment Paper or a silicone baking mat. These will work for a quick clean up and you won’t waste any overflow wax.
- A container with a handle for pouring
- A clay loop tool
Instructions
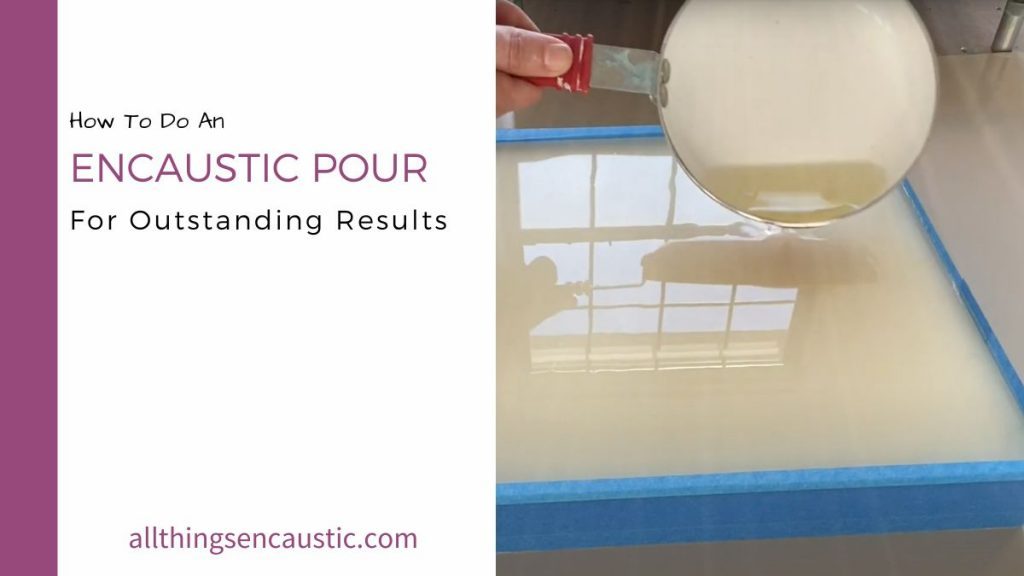
- Create a lip or dam around the sides of your panel with tape. Burnish the tape with your fingers all the way around to ensure a tight seal.
- Ensure that your work surface and panel are perfectly level. This is a very important step! Use shims as necessary.
- Protect your work surface with a silicone baking sheet or parchment paper
- Heat up sufficient encaustic medium to cover your entire panel.
- Preheat your substrate using a heat gun, not a torch. Remember that painter’s tape and parchment paper are both flammable.
- Pour the molten encaustic medium onto the panel evenly covering the entire painting surface right to the corners
- Step away. Don’t move it or even bump the table until it has completely cooled
- When your poured wax is completely cooled, remove the tape and scrape the edges as needed with a clay loop tool
You now have a beautifully smooth encaustic surface.
An Encaustic Pour Demo
Here is an excellent demo video from R&F Paints. I’m more than a little envious of this clean and spacious studio!
Give it a try!


What are the best pourers? I see in the video, a skillet is being used and I’ve been using a candle wax melting pot which is not giving me the pourer I’m looking for. I am putting small and larger sized panels.
Thank you!
Hello Ruth
I have been doing encaustic for a while now. My question is, what’s the point of doing a pour if you are going to keep working on your painting on top of it? Is there a specific technique you can use after on that perfectly smooth surface that justifies the pour? Could it be just to speed the process by avoiding layer after layer of wax and fuses? Finally, is it as strong and durable as the wax surface created with the layer by layer method?
Thank you very much
PS. If you go to my website, there aren’t any encaustic pieces there as i don’t think that mine are good enough as the rest of my work to to publish.
I am new to encaustic and have made 2 efforts so far and each of them ended up with areas of the pure encaustic medium drying cloudy. I let the panel completely cure for months and have occasionally polished the surface to create the gloss finish but its still reveals the cloudy patches. Ids this normal or have I overheated the encaustic medium to a point that it has permanently discolored? Thanks for posting your tips and experiments its very informative.
Hi Glenn, Are you using damar resin in your encaustic medium? Damar prevents cloudiness. It raises the melting temperature and acts as a hardening agent helping the encaustic medium to cure.
Hi Ruth.
Do you need the blue tape, or can you just pour, let the wax pour over the edges, cool, and still have a smooth finished surface?
Maybe the thickness of the wax would not be as great, but would this work?
Thanks!
You need the tape to create a berm around the edges, otherwise the wax will not be thick enough.
on the pour method can you do multiple pours after the first dries?…thank you